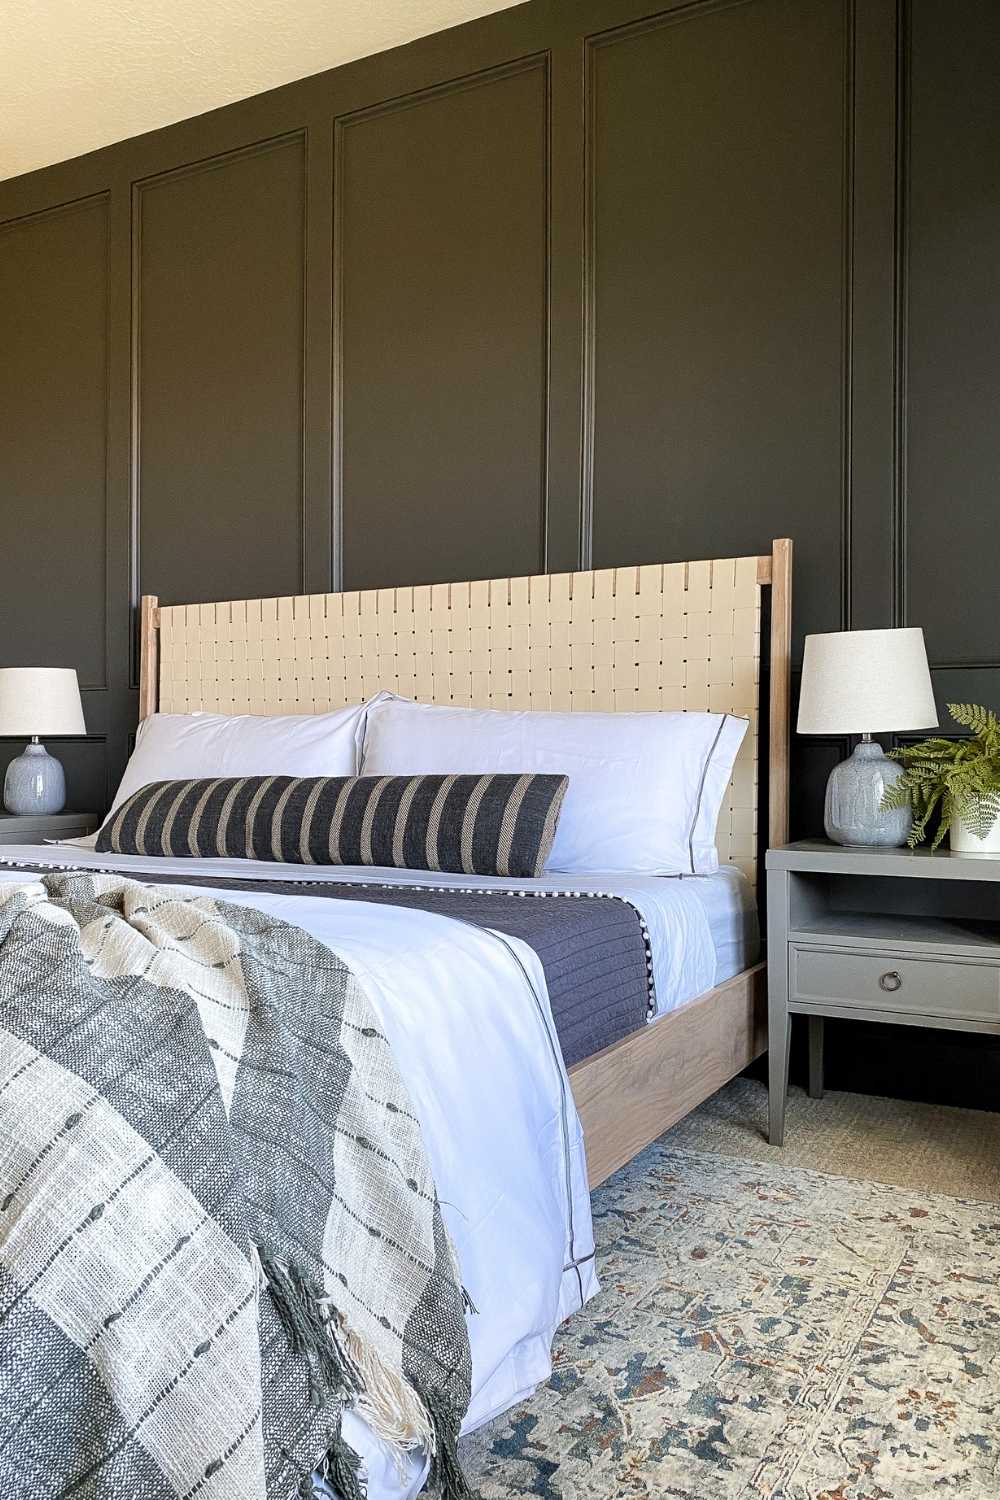


If there ever was a bed that has stopped me in my tracks, I would say this stunning Crate and Barrel Rio bed did just that. And I’m sure if I saw it in real life I wouldn’t be able to live without it. But the DIYer in me knew I needed to find a way to build a similar woven leather bed that was beginner friendly AND budget friendly. I’m happy to report this DIY King Woven Leather Bed can be built for under $200 and with minimal tools. Now let’s get started.
Materials List:
(3) Select Pine 1×8
(1) Common Board Pine 1×8
(2) Select Pine 2×2
(1) Select Pine 1×3
(3) Select Pine 1×2
(2) 2×3 Stud
(10-14) Common Board 1×3″ or a slat platform similar to this to hold your mattress
Wood Filler
1 1/4″ Kreg Pocket Screws
Wood Glue
Wood Stain
Wood Sealer
2 yards of leather vinyl fabric (linked is similar).
Bed Rail Brackets
Heavy Duty Staples
Tools:
Miter Saw
Orbital Sander
Kreg Jig
Kreg Clamp
Level
Tape Measurer
Drill
Router (optional)
Router table (optional)

Cut List:
(2) 81″ Select Pine 1×8
(1) 77″ Select Pine 1×8
(1) 77″Common Board Pine 1×8
(2) 50″ Select Pine 2×2
(2) 13.5″ Select Pine 2×2
(1) 77″ Select Pine 1×3
(1) 77″ Select Pine 1×2
(2) 32″ Select Pine 1×2
(2) 79″ 2×3 Stud
(10-14) 79″ Common Pine 1×3 (optional support structure)
(2) TBD Select Pine 2×2 (optional support structure)
Building the Bed Frame
These plans are for a king bed frame, but could easily be adjusted to acomodate any size mattress. To do that take your mattress dimensions and add 1 inch in length and 1 inch in width and that’s the INSIDE dimensions of the bed frame. If you want to see the bed being built in real time check click here.
Cut and Taper the legs *Optional
The starting material for the bed’s 4 legs are 2×2″ select pine. Cut the headboard legs to 50 inches and the footboard legs to 13.5 inches. If you want your legs straight and boxy leave them as is. if you want a subtle curve to the legs you can sand the edges down with 120 grit sandpaper so they aren’t as pointy.
Build a taper jig, to do so let me link a great tutorial here on how to build one. Then clamp it onto your miter saw and cut the last 4″ of the legs at a 4 degree taper on two sides.
If you have a router and router table you can recreate the same legs seen below using a 1/2″ rounded bit and run the legs through the router table on all 4 sides.

Another optional thing is to run the 4 pieces that create the frame for the leather through the router with the 1/2″ rounded bit to give the entire bed more of a dowel look than straight sticks. It also helps the leather fabric roll to the over the frame.
Headboard Pocket Holes
Use a Kreg jig pocket hole jig to put two pocket holes at the end of the 1×3 and 1×2’s that create the leather headboard frame. Use a Kreg clamp to keep the two boards flush as you insert a 1 1/4″ screw and wood glue to attach the pieces as shown below. All pocket holes will be in the BACK of the bed, so no need to fill them, but you certainly can use wood filler or a plug to cover the hole.


Assemble the Footboard
Attach the 2 footboard legs to the 79″ select pine 1×8″ using 1 1/4″ pocket screws and wood glue. Set aside.
Assemble the Siderails

The side rails are 2 pieces of 1×8″ select pine that are 83.5″ long. Attached is a 2×3″ stud that is 79″ long. Apply wood glue and insert 2″ screws straight into the 2×3″ and into the select pine side rail.
Assemble the Bed Frame
The height of the 2×3″ is going to depend on if you want a box spring or a platform style bed. If opting for a boxspring, place the 2×3″ as low as possible on the side rail. Seen below the bottom of the 2×3″ is 2″ from the bottom of the side rail.

You have basically done it! You have a headboard frame. You have a footboard and you have two side rails. Yes… it really is THAT simple to build a bed frame. Next step is a pretty simple. Just like you assemble a bed you bought from a furniture store, we are going to assemble the bed frame you just made using these side rail brackets. These brackets are not only stronger than using pocket screws to attach the side rails, but it makes dissembling the bed and reassembling it a breeze!
Then, grab a friend to help you hold the side rail and the foot board so the side rails sits flush against the bed leg. Predrill and attach the bracket into the bed leg and side rail. Repeat until all 4 legs are attached to the side rail.


Cutting the Leather for the Headboard
The leather vinyl fabric I chose to use is inexpensive and the color tone is perfect again the wood tone and accent wall, but I will say it is not real leather and it is pretty thin. That being said, if you are the type of person who likes to rest or lean against your headboard, you may want to swap for a thicker fabric or full grain leather instead of this vinyl fabric. I do think overtime it can stretch out especially since it’s only attached with staples. But if that isn’t a concern for you, use this same style fabric because its budget friendly, easy to work with, and looks awesome!

First cut your leather fabric into 2″ strips. I used a drywall square to help create straight 2″ lines, then a pair of fabric sheers to cut it into strips. You could also use a rotary cutter. I purchased 2 yards of fabric and had just enough to cover the entire king headboard.
Weaving the Headboard
Attach the vertical leather strip to the back top of the headboard frame with one heavy duty staple. Space the next 1/4″ away and continue down the top back of the headboard with vertical strips. Do not attach the vertical strips to the bottom of the headboard frame just yet. It is easier to weave if they are loose.
After all of the vertical strips are attached start on the left side and attach a horizontal strip with 1 heavy duty staple and weave in an under over pattern until you reach the right side of the headboard frame. **every single strip needs to go AROUND the frame and attach in the back. If it isn’t pulled around the wood and just stapled it puts too much tension on the fabric/staple and will rip.
Continue to space the horizontal strips 1/4″ apart and alternate the over under over under with under over under over. Once you’ve attached all the horizontal strips go back through and add a second staple on each strip, and firmly pull down and attach the vertical strips to the bottom back of the headboard. This whole process should take less than one hour and is going to knock the socks off your husband, guest, friend, basically everyone who see’s it :).


Adding the Support Structure
There are several ways to go about adding the mattress support to a bed frame. For this specific bed, I actually stole the support 1×3’s and 2×2’s from my master bed. Here are your options:
1- 1×3″ common board planks + box spring + 2×2″ support board in the middle (if its a king bed)
2- 1×3″ common board planks + plywood
3- platform bed base
4- metal bed frame sitting inside your side rails + boxspring

Stain

This bed is stained with my secret not so secret stain combination that I basically use on EVERYTHINGGGGGG. Like my living room builtins, cane daybed, bunkbed slat wall, herringbone floating shelves, and I keep finding more and more uses for it.
To see the step by step process of how I apply the stain click here.
For the stain you will need Varathane White Wash Stain (I haven’t found another brand or product to be as good), and a colored stain of your choice. My go-to’s are provinical, special walnut, and flagstone. The reason why I have 3 colored stains is because I work with different types of wood and find that the wood species will pull stain differently. This bed is built with pine and pine I love using provincial with the white wash, but birch plywood I love using special walnut with white wash stain.
Applying Stain
Apply white wash stain to freshly sanded wood with a clean rag or paper towel. Immediately after applying white wash stain take another clean rag and wipe it off.
After 5-10 minutes apply the Provincial stain (or similar color). Immediately wipe it off with a CLEAN RAG (so so important), with 2-3 passes.. do not excessively rug or wipe the stain off, that will cause grey splotching. After it has tried seal the stain with a water based poly like General Finishes High Performance in Satin. This is my go to sealer.
The reason for the white wash stain first is it helps neutralize and even out the stain color. It fills in the grain of the wood so the stain can’t penetrate and make it very dark and in the end you have a muted beautiful color.


For more fun DIY’s and behind the scenes of projects be sure to follow along on Instagram @honeybuilthome 🙂
happy building! xo- Christine


So amazing. We will be doing this for our guest bedroom. Thank you so much for all the diy you do and the tutorials.
Looking forward to making this! Are the side rail cuts 81″ or 81.5″? Thanks!
I mean 81″ or 83.5″. Thanks!
They are 81’. Just double checked.
I’m currently working on staining a bed. How do you get the stain to take to the wood glue and filler? Mine looks like a completely different color.