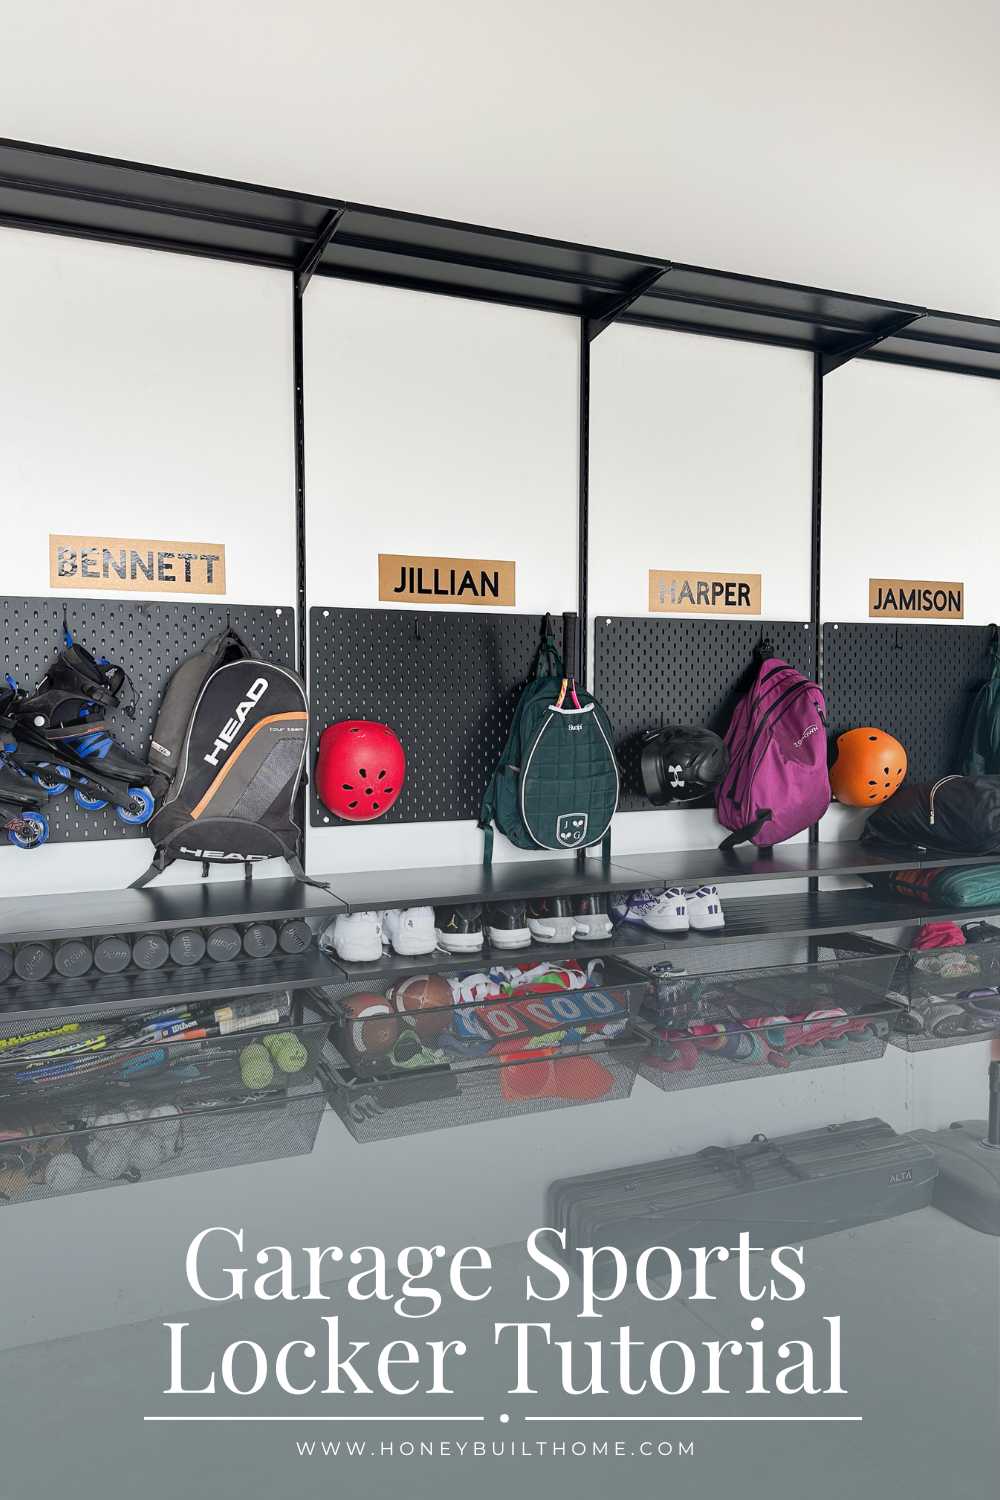
If you’ve ever tripped over a soccer ball, searched high and low for a missing tennis racket, or spent twenty minutes digging through a pile of helmets and swim bags, this tutorial is for you. With four kids in sports and activities, our garage was starting to feel less like a storage space and more like a black hole of gear and I was sick of just needing to “buy a new one” because I couldn’t find the (bat/glove/ball) from last year. I knew we needed a garage locker system. Something flexible, affordable, and streamlined. Enter the IKEA Boaxel system.
I looked into the Container Store’s Elfa system, which does have good discounts a few times a year, but ultimately decided on the BOAXEL system because of cost and ease on install.

Planning the Layout
Before heading to IKEA, I measured the garage wall I wanted to use. I sketched out zones for each type of activity:
- Sports Gear Zone: Balls, bats, helmets, and pads.
- Outdoor Fun Zone: Pool noodles, goggles, scooters.
- Seasonal Zone: Snow gear in winter, camping gear in summer.
Tip: Take inventory of everything you need to store before shopping. That way you can plan how many shelves, baskets, and rods you’ll actually need.
Supplies
Shop everything here.
Boaxel System – use their planning tool & it’ll give you your whole shopping list.
Best Stud Finder
Color changing laser level
Drywall Anchors
3″ wood screws
Drill
Black Vinyl Name Tags
Gold Vinyl background name tags
30″ x22″ Peg Board & (similar)
Ladder


Garage Locker System Installation
Here’s how we set our locker system up:
Before we even picked up a drill, I pulled out my Franklin stud finder. This tool is a lifesaver because instead of giving you just a single dot or beep, it lights up the entire width of the stud. No more guessing games or drilling unnecessary holes—just a clear view of exactly where your support is. For a system like Boaxel that needs to be mounted into studs, this accuracy is key.
Once the studs were marked, we grabbed our color-changing level to keep the suspension rails perfectly straight. Instead of squinting at tiny bubble lines, this level glows green when you hit “perfectly level.” It’s one of those tools that takes the stress out of measuring and makes the whole process so much faster. Together, these two tools made installation smoother and way more foolproof.
To install the top rail into the studs, I used 3″ Power Pro star bit screws. For the vertical rails, I didn’t hit studs, so I used EZ drywall anchors. Be sure to check the head size to make sure they fit inside the rail. These were the two packs I used: #7 screws and #8 screws. These combo packs of screws and drywall anchors worked very well, and I’d highly recommend them!
- Find Your Studs – Boaxel tracks need to be screwed into studs for stability. I marked them before we started.
- Mount the Rails – We used the Boaxel suspension rails first, making sure they were level. This is the backbone of the system.
- Click in Uprights – These vertical pieces hang from the rail and create the structure.
- Add Shelves and Accessories – This is the fun part. We added:
- Wire baskets for balls and gloves (easy to toss in and grab).
- Deep shelves for larger bins (off-season gear, camping supplies).
- Hooks for helmets, swim bags, and even jump ropes.
- A lower shelf for the kids so they can put away their own stuff.
- To keep things simple and give each kid responsibility for their own gear, I used my Cricut to cut vinyl labels with their names and placed them over their designated sections. Now everyone has a clear spot for their bags, helmets, and gear. It not only keeps the garage organized, but also helps cut down on the “Mom, where’s my…?” moments before practice. Here’s the gold vinyl & black vinyl I used.
The Transformation

Once everything was in place, the difference was immediate. The floor was clear, gear was sorted by activity, and everyone knew where things belonged. My kids can now grab what they need on their way to practice—no more chaotic searches.
And honestly? It feels like we gained square footage in our garage.
Tips for Success
- Label everything. Kids (and husbands!) are much more likely to return things if they know where they go.
- Leave extra room. Sports seasons change, and gear always grows.
- Think vertical. The more wall space you use, the more floor space you save.

Other Blog Posts You May Like:
Garage Workshop for a DIYer
Epoxy Your Own Garage Floors


Amazing! Any chance you’d be willing to share a close estimate to the final cost?
around $500 for the system I used.