
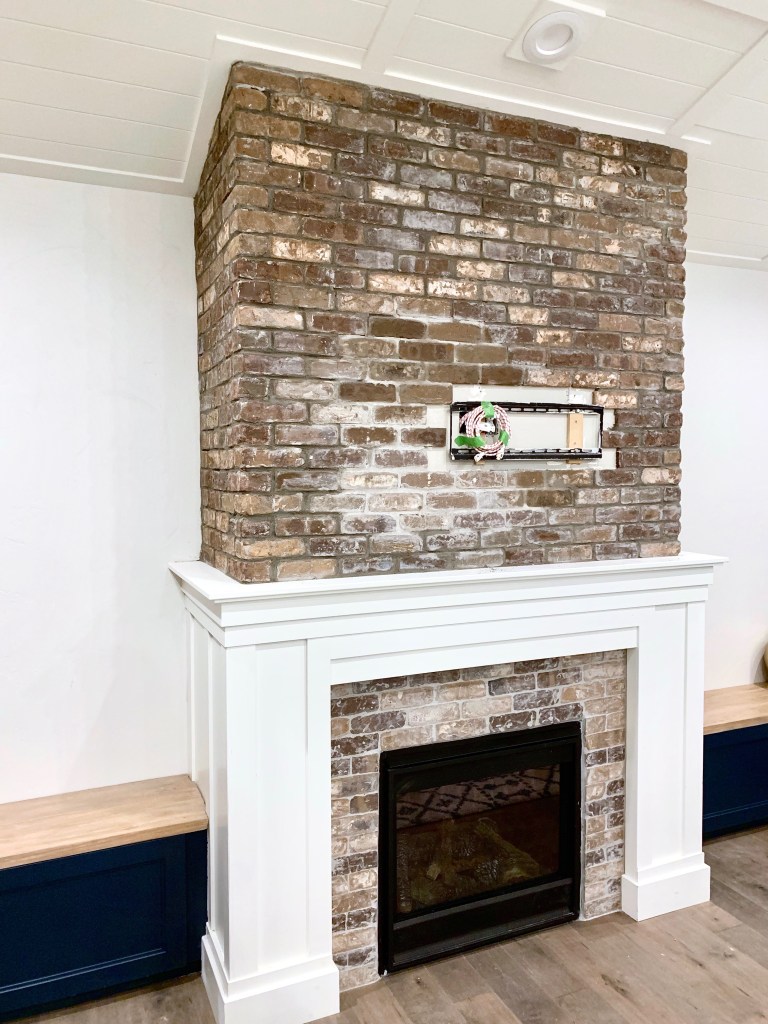
How to Install Thin Brick the Easy Way


It can be intimidating to install thin brick accent wall. Others may lead towards tile or paint instead because the idea of installing brick seems too daunting, but alas I am here to tell you that the installation of brick is not as hard as one might think.


For a full tutorial on how to build these benches click here and tips on how to fresh a living room on a budget click here.

There are several different types of brick, but the brick I am talking about is thin brick which is 1/2″ thick brick pieces.

Where to Buy Thin Brick
Where can you buy thin brick or brick veneer is sold at home improvement stores like Home Depot or Lowes. Most have to be special ordered or order online, but another option would be to visit a local brick store or order online from a brick fabricator. Old Mill Brick is an online brick distributer that sells not only individual bricks, but bricks on a fiberglass sheet called BrickWebb.


What brick did you use?

I used McNear thin brick in the color Embarcadero on my fireplace, and Old Mill Brick’s Cafe Mocha on my basement arch and kitchen. The Corner pieces are sold based on the linear foot so just measure the height of the wall and that’s how many feet you need. The flat pavers are sold by the square foot so measure the length and height in feet and multiply.


Materials Needed:
Brick
Brick on Webb
Corner Brick
Corner Brick on Webb
Tile Adhesive x1 bucket
Loctite Power Grip
Narrow Notched Trowel x1
Mortar
or Pre-mixed mortar
Tile Cutter
Optional: Wet saw
Spacer Options (choose 1)
Bender Board
Tile Spacer
Wood Dowel
Rope

Install Thin Brick

To install thin brick there’s are the steps:
- Measure the spacing of the bricks by laying them out against the wall to make sure the pieces will all fit without a small sliver piece on the end. If necessary start with a 1/2 size brick and alternate so the seams meet in the middle of the brick below and above it.
- Apply thinset with the notched trowel creating a line pattern on the back of the brick. Having the lines on the back side helps prevent air bubbles and ensures you are applying the same amount to each brick.
- Start applying the bricks on a level surface (if needed install a temporary straight edge with some scrap trim/wood).
- Push the brick into place, apply acrylic thinset to the next brick, use a spacer to ensure equal spacing between bricks and apply the 2nd brick, if you are using the brickwebb sheets the spacing is done for you, and the fiberwebb helps hold the bricks in place eliminating the need for a spacer. If there are single bricks that are sliding use some loctite power grip to help hold it in place.
- Follow this process for the entire row.
- Place a spacer above the row and start your second row alternating the seams so if you started with 1/2 a brick start with a full brick for this row.
- Allow the thinset to completely dry before removing spacers and applying grout.
Completing a project like this can sometimes feel overwhelming. If you need help learning the basics of not only tools, but how to cut wood accurately, caulk, finish paint like a professional. Check out, DIY Beginner Basics, you can go at your pace with my online course that teaches you how to DIY. Head on over to www.homeschoolwithtools.com and use code HONEYBUILT10 for $10 off.


Cutting bricks
The simplest way too cut a brick is with a manual tile cutter. Mark the brick where it needs to be cut. Line the mark up with the scoring blade on the tile cutter. Press firmly as you score the brick with the blade. Then press the flat part against the brick and it should snap on the line you scored.


This method is great for straight cuts, but if the amount you are cutting is less than 1″ the manual saw sometimes has a hard time scoring and snapping correctly, but any cuts larger than this it works like a charm.
Use a wet saw to cut the bricks along the line. If you don’t have a wet saw you can mark these bricks and take them into Home Depot where they can cut them for you for free!


Cutting Angle Cuts
The easiest technique I have found to cut corners or angles is to create a template brick out of paper.
- Trace brick on a piece of scrap paper
- Cut out the paper rectangle
- Position onto the wall in the space the brick will go (including where your spacer would sit).
- Fold the paper along the angle.
- Take the folded paper and trace it onto the brick
- Cut the brick on the line (with a wet saw).


Grouting
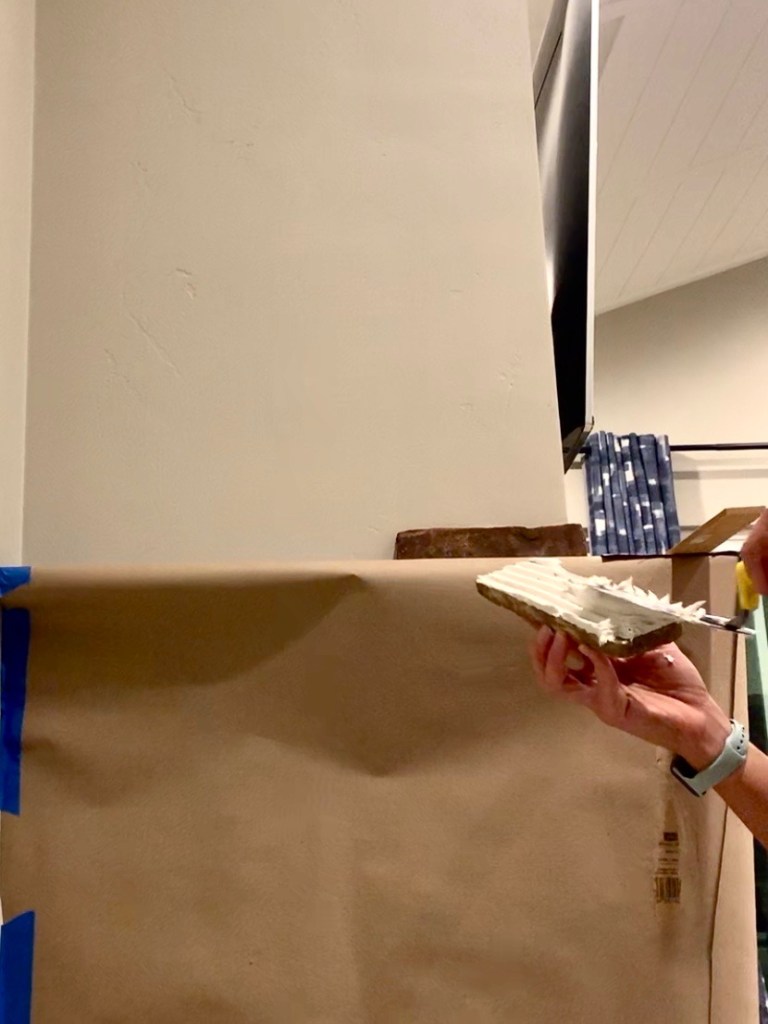
Once all the bricks are dried its time to grout. To mix up the grout add less than 1″ of water into a 5 gallon bucket. Slowly add the powdered mortar into the bucket and use a power drill and this grout mixing paddle to stir the mixture until its a thick pancake like consistency. Too runny will make a mess everywhere and too thick will not squeeze out of the grout bag. Once the mixture is at the correct consistency scoop it into the grout bag making sure to kink off the tip.


Now you are going to apply the grout onto the bricks like icing a cake in the seams. Apply generously so it sticked out further than the brick. Allow for it to dry for 10-15 minutes before taking the end of a paint brush (or your finger in gloves) to squish the grout in between the bricks as well as knock off any access. You should have your space taped off and a drop cloth down because this process is EXTREMELY messy. Word of warning. don’t use your bare fingers to press the grout in or your fingers will be raw! If needed, apply more grout to the spots that are too low or chipping. To create a lighter shade you can also use a sponge and wipe some of the grout onto the bricks to create a smeared effect.
Sealing
Depending on where you are putting your brick accent wall, you might need to seal the brick and mortar. These materials are very porous and easily can be stained.
Finishing
There are a few different things you can do to finish off your brick look. One would be stopping, and enjoying the natural looking brick you just installed. Two would be a light white wash using a pre-made white wash stain, or white paint diluted with water. Third, apply the grout in a way that it creates a German Schemer look. This is done with a grout trowel and sponge. Fourth, paint your brick with masonry approved paint. An all white or all black brick wall looks elegant and timeless just like natural colored brick.


Be sure to comment below with any questions on how to install thin brick, and follow along on instagram @honeybuilthome for more home DIY projects and tips.
Don’t forget to head on over to my online course, DIY Beginner Basics, where I will teach you, and walk you through all you need to know to start DIYing. Use code: HONEYBUILT10 for $10 off.


