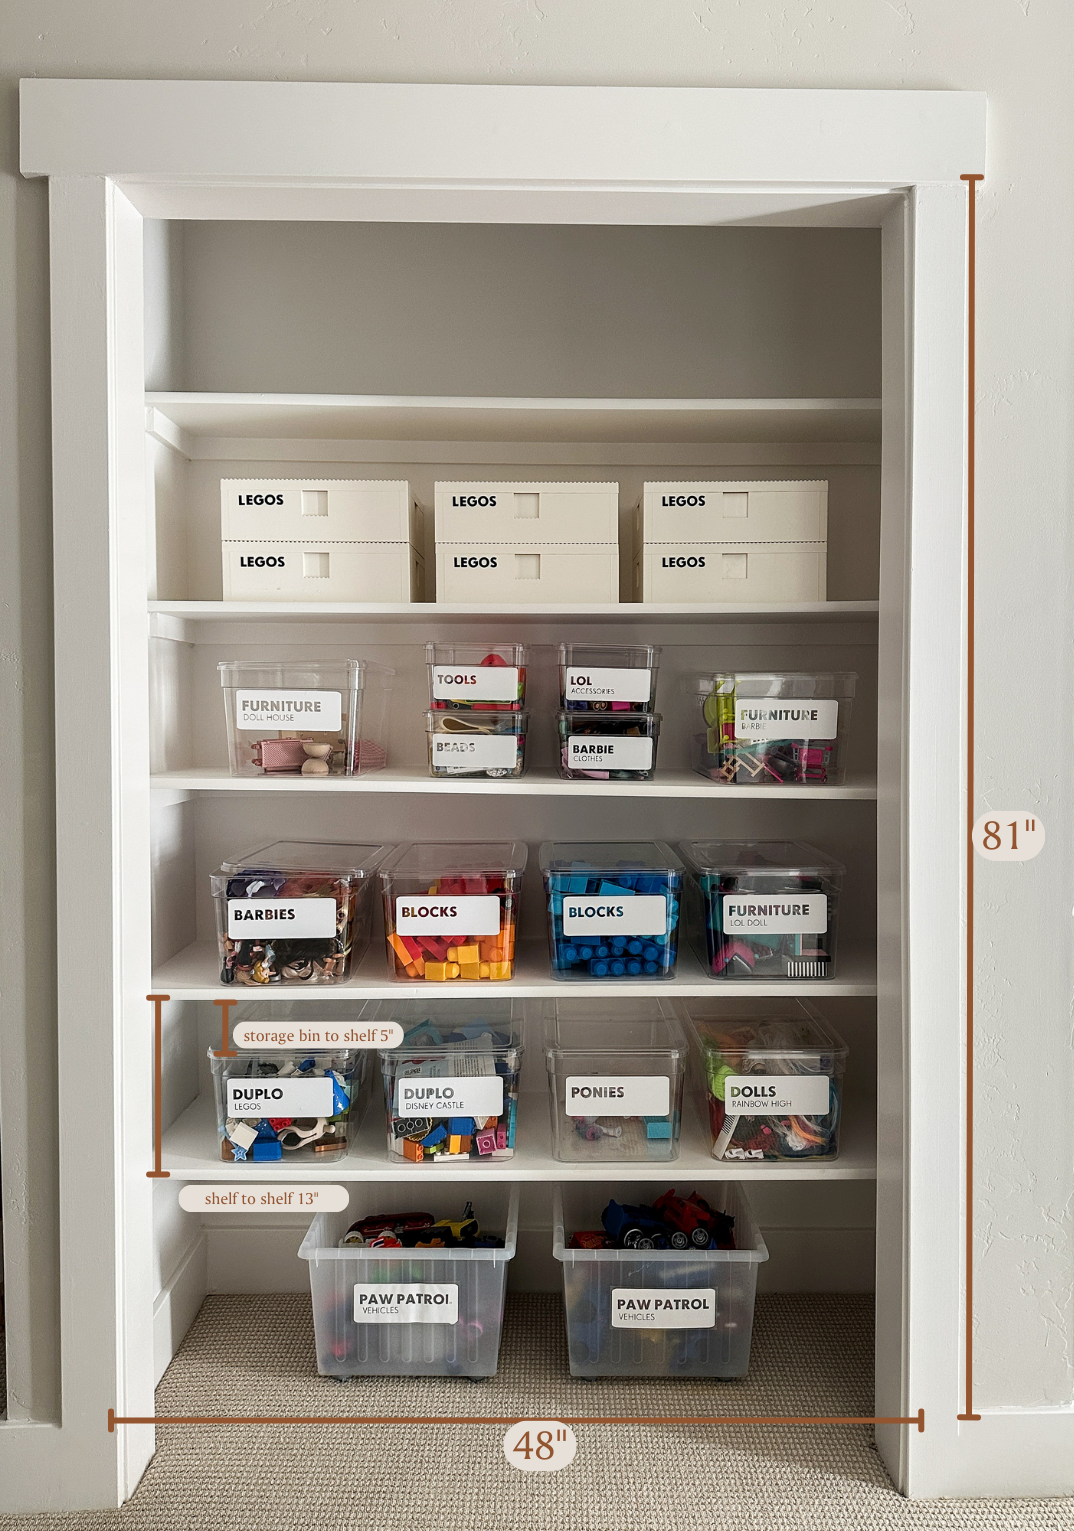
You can’t ever have enough storage, right? We’ve had this space unfinished in our house for the last 6 years and finally I installed some shelving to take it from useless to fully functional! I even bought the shelving for the closet a few years ago intending to build it, but never did. Better late than never showing you this easy, beginner friendly Toy Closet.

Supplies to build a closet
1×2 support pieces
Bullnose Particleboard
2″ Brad Nails
Primer – my favorite
Paint – choose a semigloss or satin for easy cleaning
Caulk
Wood Glue
Tools:
Brad Nailer or this one
Level
Stud Finder
Miter Saw or Circular Saw + Rip Cut
Caulk Gun
Building closet shelving can be a very beginner friendly and straight forward project. To see a video of the build in action check out my IG reel.
Before you actually get building you are going to want to plan WHAT is going on the shelves. If you plan to use any organizational bins, buy those first so you can plan your shelving around the bins. Trust me when I say you don’t want to just guess and build shelving only to learn it’s a hair too short for the bins you want to use or that has way too much wasted space.
MEASURE
First things first, measure. Take your bin and determine how much space you want above each bin. For this toy closet I opted to have enough space to toss in or grab out with bins staying on the shelf. To be able to do this keep a minimum of 4″ spacing from the top of the bin to the bottom of the next shelf.
My measurements –
First Shelf: big floor bins with wheels + 5″
Second Shelf: big bin + 5″ (13″)
Third Shelf: big bin + 5″ (13″)
Fourth Shelf: big bin + 5″ (13″)
Fifth Shelf: big bin + 5″ (13″)
Mark your wall – use tape or a pencil to mark your wall. Remember to add the thickness of your shelf, in my case I put the tape measurer on the floor and went up 13.75″ (distance + thickness of my shelf 0.75).
Cut your support cleats
Take a tape measurer and measure the length of your wall. Cut a 1×2 that dimension and install it into studs using your brad nailer. Check with your level to make sure it’s straight! Cut 2 short support pieces 2″ smaller than your shelf depth. The reason why I choose 2″ is because I don’t like my bracket being visible on the side hanging past the shelf, but do you do.
Install all of your support pieces with brad nails. If there’s a section where you are unable to get into a stud you can cross the brad nails by angling the gun left and right.
Caulk
Caulk the bottom and top of your support cleats. This will help secure them to the wall plus make your shelving look so much cleaner once things are painted.
Cut your shelves
Measure the distance for your shelves and cut them to length using a miter saw, circular saw, or jig saw. Which saw you use doesn’t matter too much in this project, just use whichever you have and are comfortable with.
Dryfit your shelves to make sure they have a snug fit.
Apply wood glue to the top of the support cleats and sandwich your shelf into place. Install a few brad nails from the top of your shelf straight down into the support cleats.
Caulk the top and bottom of the shelf.
*You can choose to prime and paint these before or after install, but know it might be a little challenging to get all the sides once they are installed.
Prime and Paint
Lastly, prime and paint the shelves to give them a fresh look. And that’s it! Pretty doable right?
Tip: If your shelf is running a span longer than 6′ you will want to add another 1×2 to the front to serve as a support board for the weight.

Here’s How You can Recreate My Labels:
Cricut Template click this link and you can customize it right on Cricut!

Font: Drescher Grotesk BT Standard Roman. Large is bold. Small is regular.
Large lettering 30.5 font size
Small lettering 18 font size
Rectangle 7.37″x2.86″ (I just guesstimated what would look best on my bins).
Small Labels:
Large Lettering 26 font size
Small lettering 14 font size
Rectangle 6.25″ x 2.42″
Write out a list of the big labels and a separate list of the small labels.
Use my cricut template above and customized the words for your own bins.
- Cut out the vinyl
- Weed out the actual letters, be sure to keep the inside of each letter and not throw those away
- Apply transfer tape to the top of the label and squeegee it for a bubble free transfer
- Squirt the bin with a light spritz of water
- Spply vinyl and smooth out with squeegee
- Remove transfer tape at a 45 degree angle
- Wipe off water
Toy Closet Links
Lego Bins
Large Clear Bins
Small Clear Bins
Large Bins with wheels
White Vinyl
Black Vinyl
Cricut
Paint Color: SW Snowbound in satin finish on all shelves and trim
Wall Paint Color: SW Modern Grey at 50% lightened in eggshell
I eventually added doors to the closet, and had a mess up with the paint. Check out that in my IG Reel HERE
What toys do we have stocked in our closet? Check out my Top of the List Toys, Girls Gift Guide, Baby Gift Guide and Boys Gift Guide


+ show Comments
- Hide Comments
add a comment