

What kid doesn’t want to have a miniature playhouse inside of their room? Here’s a full tutorial on how to create a playhouse with entrance to the under the stairs closet which is otherwise unused space.

Framing the wall opening for the playhouse
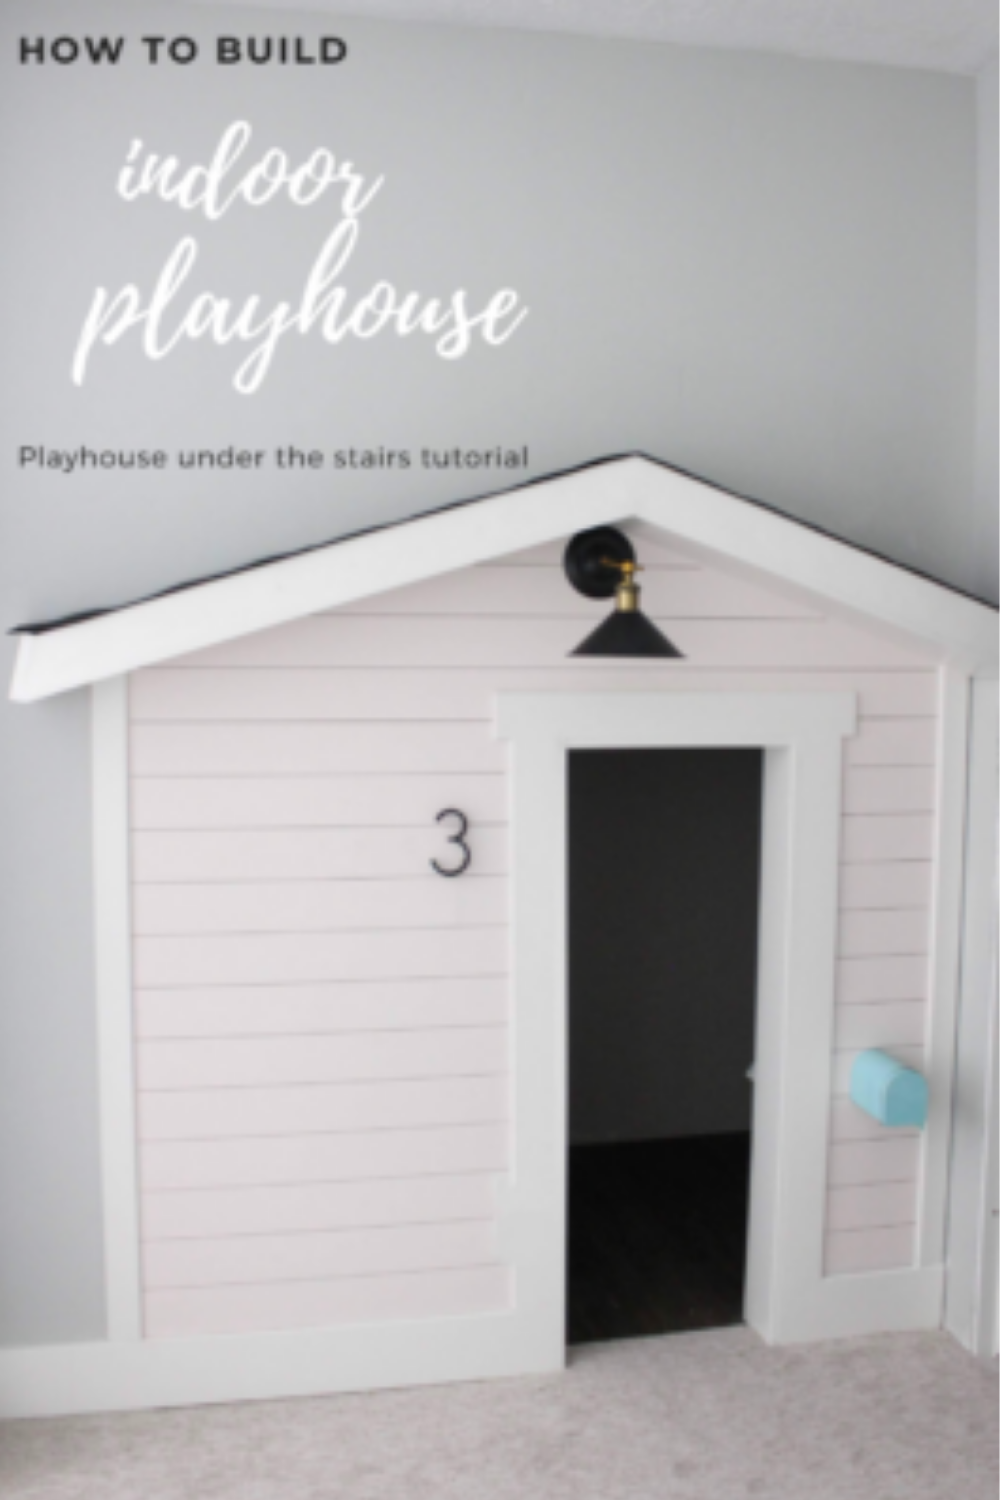
When framing this wall we were sure to go as tall as we could because in our last home even our 2 1/2 year old had to duck to enter. The cutout is in line with the stair landing.
We added some studs to create a miniature doorway and had our sheet rocker leave it exposed 2×4’s so we could put up trim.
We eventually plan to add a door but that is currently beyond my minds comprehension.
One thing we thought of too late was adding a window for the playhouse. If I were to do it again I would definitely frame out for a window l, maybe 2!
Trim the Door for the playhouse
The doorway is trimmed out with 2 1/2 by 1/2 inch trim and the top plate is a little thicker at 4 inches to give it a craftsmen look. The rough opening is 49” tall by 18” wide.
Shiplap the playhouse
Next I bought some bender board strips from Home Depot. These boards are stupid cheap. I love that they were precut and thin/light weight.


I cut the boards to all be 28” on the left and 8.5” on the right left enough room for a vertical trim piece as shown.
Once I got to the higher tricky boards I had to create some notches with my table saw. A jig saw would also work to make these notches.
Now for the 2 hard parts (they really weren’t that hard but took some brain power).
Roof
I couldn’t continue doing the slats until I knew where my roof was going to hit. So I stopped the shiplap slats and started on the roof.

The roof’s framing is composed of 2 2x4x8’s! That’s it!
Cut list:
x2 boards that are 43” with a 30 degree angle in both ends
x2 boards that are 32” with one 30 degree angle one one end and a 15” angle on the other end since that part buds up to my wall (if it didn’t I would have kept a 30 degree angle).
x6 – 5” boards cut straight. These will be your spacers to give the roof depth.
Draw with pencil along the wall where you ideally would want your roof to hbe,

Cut a 30 degree angle on one end and the second end with a matching 30 degree angle with some overhang.
Then take a second 2×4 and cut another 30 degree angle.
Once I had these two boards cut I copied them onto the second 2×4 so I had 2 boards 43” and 2 boards 32”.
I chose to have my roof be fairly shallow. To eliminate the heaviness of it and I also have a closet door that sits right next to the roof so I couldn’t make it any deeper without it interfering with the walk space into the closet.

The roof’s depth is 8”.
I then cut x6 5” boards to place in between my framing pieces.
Lay it all out in my carpet to get an idea of how to measure for the underneath boards. 1/2 inch MDF because that’s what I had laying around from another project but you could use some strips of backer board like used for the ship lap or 1/4 inch MDF.
I held up my MDF to my framed wood and drew a line to cut it to size. My MDF is 43” x 7 7/8”.
I cut two smaller boards 8” x 4 1/4” to cover up the sides.
Install the Roof
Now it’s time to install the roof!
I held both roof pieces up the wall and traced with a pencil onto the wall exactly where it would sit. I then took my finish nail gun and fired away into the studs to secure my boards. Instead of nails you could do screws into studs which makes it cleaner if later down the road you want to take down the roof. Or use screws and some drywall anchors (but it’s much preferred to go into the studs to make it more sturdy).
Once the two roof boards were up I installed the 5” pieces with some finishing nails shot in at an angle. This part was tricky to hold the board straight while shooting a powerful nail and trying to keep everything aligned while not nailing my fingers to the wall.
Once all 6 of the 5” boards were up I used my husband to help with the next two roof framing boards keeping it aligned and steady.
Angled shiplap cuts
Back to the shiplap siding!
Now that the roof is installed I took a piece of paper the same width as my board and placed it into the corner where my next shiplap would hit.

I lined it up just as a would a board and drew a line where the paper hit the roof. I then carefully bent my paper at this line and traced it onto one of the bender boards.

Once I had the line drawn I ran my board through my table saw to give it a clean cut. You could also cut this with a jig saw or a circular saw.

Once one of the ends was cut to fit the space I took another piece of paper and repeated these steps on the other side.
Repeat this until you have all of your shiplap/siding boards cut.
Prepping for paint:
Fill all the nail holes and seams with Drydex Spackling and sand to a smooth finish. I could have used some trim to cover up the front part of the roof to give it a cleaner appearance, but instead of the added time and cost I chose to use sparkling to smooth out all the knots and chips in my 2×4.

I have fallen in love with this Scotchblue Prep tape.
It makes prepping for paint spraying so simple. Since my daughters room was just finished a few months ago our carpet is BRAND NEW and this plus some additional drop cloth kept the carpet free from any paint spills. I also used my Homeright Paint Sprayer which is fantastic! So easy to clean and VERY little over spray.


Steps of painting:
- Prime everything first. This is the primer I used. Kilz 2
2. Spray the Pink: the color is Sherwin Williams Faint Coral at 130% (so a little brighter and more vibrant).
** TIP: You can re-tint paint if you aren’t happy with the color. I originally purchased SW Faint Coral and sprayed the herringbone wall with it. I wasn’t super happy with the “pop” of color. It blended with my trim and most of the time the wall looks white. I took my half empty gallon of paint back to home depot and they added more tint to it to make it a tad more vibrant and it looks SO GOOD!
3. Tape off the shiplap and spray the trim white.


Shingles
4. Time for shingles! I wanted to use real shingles for the roof. Talking with a worker from Home Depot I was able to bargain and get 6 sheets of shingles for more than 50% off…. drum roll… $2.75 for all 6! A pack of shingles runs anywhere from $30-55. Talk with a worker and see if they have some clearance shingles they can sell you. The ones I got weren’t the color I was going for so I spray painted them matte black.

I ended up only needing to use 2 of the 6 shingles and cut them to size with a pair of sharp kitchen scissors and secured them with my finishing nail gun and some brad nails.


and there you have the finished product of the playhouse!
Budget Breakdown:
x12 MDF backer board at $2.75 a piece = $33
x2 2x4x8 at $2.72 a piece = $5.44
Trim, used from another project – FREE
MDF to cover the bottom of roof, used from another project – FREE
shingles $2.75
Light $12 Amazon
Mailbox $2 Smiths Marketplace valentines aisle TOTAL: $55
Be sure to follow along @honeybuilthome on instagram, and my blog for more DIY post.


+ show Comments
- Hide Comments
add a comment